
Air Cannon Trigger System
Sprinkler Valve Modification
WARNING: No Liability Is Assumed By The Developers Of This Website and All Literature Is Provided Second Hand, Use It At Your Own Risk!
Sprinkler valve trigger system options
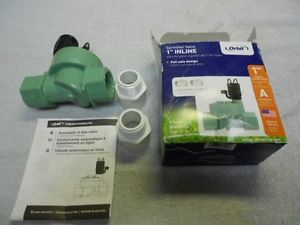
This is an Orbit 1" inline sprinkler valve that we are using for our air cannon firing system.
However, many sprinkler valves operate in the same fashion so many other choices, or brands may be used for the same purpose.
The sprinkler valve can be used as a trigger system for an air cannon in three different methods.
- Electronic sprinkler valve trigger with the solenoid electrified by batteries and a switch to open it when ready to fire.
- Manual sprinkler valve trigger using a workshop blow gun to release the back pressure and fire the air cannon
- Remote Operated sprinkler valve trigger with blow gun extension air hose for clearance spacing
Now leaving the sprinkler valve as-is to fire electronically is a quick and easy solution if you so desire. However, modifying it to open ten times faster with an air gun makes it function better, and eliminates the need for batteries, wiring, and a switch.
Therefore, we choose to modify for performance and simplicity.
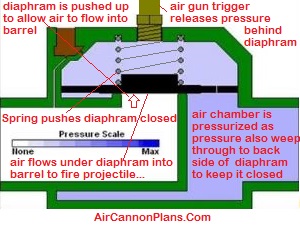
In order to work properly, the valve needs to release all of the air stored in the air chamber into the barrel as fast as possible.
How a modified sprinkler valve works
 Here
we will show you how to modify the sprinkler valve to work pneumatically.
Here
we will show you how to modify the sprinkler valve to work pneumatically.
This diagram and video shows how the valve works to release the pressure from the air chamber into the barrel.
This system works efficiently to ensure fast transition of air pressure from the air chamber through the sprinkler valve diaphragm and into the air cannon barrel.
How to modify an air cannon sprinkler valve
-
 A
low voltage sprinkler valve is a great choice for releasing the pressure from the cannon
quickly to propel your ammo.
A
low voltage sprinkler valve is a great choice for releasing the pressure from the cannon
quickly to propel your ammo.- An Orbit sprinkler valve is a popular choice since it will be modified to open faster pneumatically with a blow gun.
-
 A
1/2" male-to-male compressor fitting and an
air compressor blowgun (the kind
used to blow dust off things) with a 1/2" opening.
A
1/2" male-to-male compressor fitting and an
air compressor blowgun (the kind
used to blow dust off things) with a 1/2" opening.
Dissasembly
 I
used a 1" Orbit sprinkler valve for this build, which happens to be a popular choice commonly
used by many air cannon enthusiasts.
I
used a 1" Orbit sprinkler valve for this build, which happens to be a popular choice commonly
used by many air cannon enthusiasts.
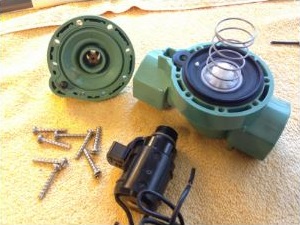
Remove the solenoid and discard. Remove the screws and top cover.
This exposes the diaphragm and and the areas that need to be plugged with some form of epoxy.
Orbit Sprinkler Valve Modification
 The
Orbit control valve requires some modifications for it to function properly with the air
gun trigger assembly.
The
Orbit control valve requires some modifications for it to function properly with the air
gun trigger assembly.
Air gun attachment
- Unscrew the black solenoid from the valve and discard.
- Remove the 8 phillips head screws securing the top to the valve body.
- Pull the top off being careful not to lose the diaphragm spring since this will need to be reinstalled.
- Drill a 7/16″ hole in the center of the top to attach a 1/4″ brass nipple as shown in the picture here. >>
- Use a drill press to accurately bore this hole, or secure the top to a board using wood screws and use a hand drill held drill (straight up and down) to drill the hole in the top.
- Run a 7/16″ pipe tap into the hole to cut the threads in it.
- Thread the male-to-male compressor fitting into the hole using some Teflon tape. Be careful not to screw it in too far, or the sprinkler valve won't function correctly.
- Screw the blowgun onto the top of the compressor fitting, making sure to use Teflon tape. Tighten it, and you're done!
Epoxy air ports
- In order to make the valve operate pneumatically, we need to epoxy the holes listed in the picture with epoxy and let dry 24 hours.
Reassemble
- Next reassemble the sprinkler valve with air gun attached including the top, diaphragm and spring being sure there is no debris inside the valve that could foul the diaphragms proper function.
- This applies to construction of the air chamber as well. Keep the air chamber clean and free of debris when assembling it to avoid having particles forced into the valve when air pressure is delivered.
 Once
completely reassembled, you are ready to install this air cannon trigger system on your
air cannon.
Once
completely reassembled, you are ready to install this air cannon trigger system on your
air cannon.
This is by far one of the most popular, and functional ways to set up an air cannon firing system.
It is simple, and eliminates the need for electronics and additional components as require when using the solenoid system.
However, if you prefer that system, you can view the instructions for assembling the electronic pneumatic air cannon trigger system here.