

P.A.C. 2 Bazooka Air Cannon Plans
WARNING: No Liability Is Assumed By The Developers Of This Website and All Literature Is Provided Second Hand, Use It At Your Own Risk!
For shoulder firing of Projectiles
P.A.C 2 Pneumatic Air Cannon Plans
Bazooka Air Cannon Launcher - P.A.C. 2
This is an archive file from a website that closed down of the Second P.A.C. pressurized air cannon made (the P.A.C. 2).
P.A.C. 2 - Pressurized Air Cannon

The P.A.C. 2 is different than the previous P.A.C. 1, for the fact that the compression chamber can hold a higher pressure, and it uses a solenoid sprinkler valve to let out the air. By having this valve it is easier to aim with, and the valve opens faster than the manual valve.
The theory for this cannon is basically the same. By pumping air into the compression chamber (the PVC on the bottom of the cannon) and letting the air out of the chamber at once it shoots whatever that is in the barrel. This cannon can hold up to 130 pounds per square inch (PSI) of pressure.
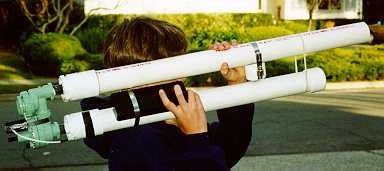
The picture below is of my old P.A.C. 2.The chamber is smaller, has no pressure gauge but its overall construction is the same.
P.A.C. 2 small air cannon launcher 1996
This small air launcher was constructed when I was around twelve years old, mostly just for fun when my friends and I were bored over the summer. This cannon is amazingly accurate, easy to operate, and has changeable barrels.
I have used this launcher to shoot potatoes up to 200 yards. and I have used this to launch golf balls, hackey sacks and toilet paper which is great for TPing a house.
When I was a child we had a Christmas performance at my church called, "Round The Table Carol Sing." We volunteered to shoot confetti at the performances. We used specially made confetti shooters that were fairly week. So I asked if I could use this launcher and it worked great!
Plans For The P.A.C. 2:
Contents:
- Overview
- Parts List
- Electrical System
- Air Cannon Fittings
- Other Important Information
- Firing Your Air Cannon
- Modifications
- F.A.Q.
An air cannon, or pneumatic cannon is a large bore device that uses air pressure to propel an object. An air chamber on the cannon (PVC on the bottom of the cannon) is pressurized to about 100PSI. All of the air is released at once, launching whatever is in the barrel. I find that my air cannon is useful for propelling all kinds of things, from large quantities of paintballs to water, potatoes, lemons, and snowballs.
P.A.C. 2 Air Cannon Parts List
| Qty. | Part: |
| 1 | 1" Anti-siphon solenoid sprinkler valve |
| 1 | 3ft of 1.5" SCH40 PVC |
| 1 | 3ft of 2.5" SCH40 PVC |
| 1 | 1.5" coupling |
| 1 | 1.5"x1" Slip x Thread Bush |
| 4 | 1" nipple |
| 1 | 1" Threaded Tee |
| 1 | Water/Air Gauge, 0-at least 150 PSI |
| 1 | 2"-1" Slip x Thread Bush |
| 1 | 2.5"-2" Slip Bush |
| 1 | 2.5" Coupling |
| 1 | 2.5" End Cap |
| 1 | Automobile Tire Valve Stem |
| 1 | PVC glue + Primer |
Electrical
| Qty. | Part: |
| 1 | Black "Project Box" (Available at radio shack) |
| 1 | Momentary Switch |
| 1 | On-Off Switch |
| A Couple Plastic Ties |
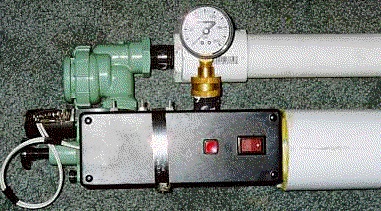
Air Cannon Electrical System
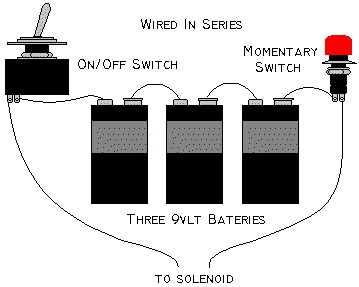
All electronic components can be found at Radio Shack. All joints should be soldered for best performance. The valve operates at 24 volts DC so the three 9 volts are ample power. The electrical system should be mounted in the project box. Drill the appropriate sized holes in the box to mount the switches.
Air Cannon Fittings
Here is a diagram of how the fittings go together:
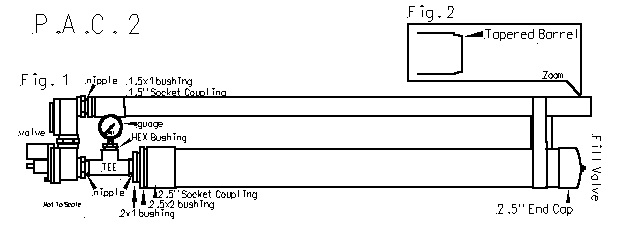
Schedule 40 PVC pipe should only be used. First cut all pieces to length and clean the ends to be glued. Drill a hole in the end cap for the tire valve and screw it in place. Taper the firing barrel and be sure to use Teflon tape on all threaded fittings.
Valve- The valve is a 1" inch electric solenoid sprinkler valve which is available at Home Depot.Fill Valve- The fill valve I used was an automobile tire valve stem. It had its own nut and washers so simply drill an appropriate sized hole in the reservoir end cap and instal the fill valve before gluing the end cap on to the reservoir pipe. Set the control box against the firing barrel and use a small hose clamp to secure it. Then insert a block of wood or something similar at the end of the two barrels and use a large hose clamp to secure them.
The control box features a safety mechanism: on-off toggle switch, and a button switch which must be pressed to fire the launcher.
Grab some ammunition (preferably a potato or lemon) and shove it down the barrel. Use a ramrod (broom stick) to shove the ammo to about 2" from the end of the barrel. Now you can charge you cannon with air. You should have some kind of hose hooked up to a source of air. Preferably an air compressor or an air tank. Put a nozzle on the end of the hose to connect to the valve stem. It’s just a simple tire nozzle. When the nozzle is on the end of the valve it will start filling up the chamber. You'll be able to hear a hiss inside the chamber while it’s filling up. Keep putting air in until the gauge reads 90-100PSI. WARNING: Never charge your air cannon above 125PSI.
Your cannon is now filled with air. The air will be held in that chamber until you fire. Warning: Try not to leave the air in the chamber for long amounts of time or when transporting the cannon. Otherwise you're ready to blast away. Arm the launcher and press the "fire" button. The projectile should go flying.
NOTE: At cold temperatures PVC can weaken causing it to explode.Feel free to experiment with your pneumatic cannon and create helpful accessories. You can make many different sized barrels to widen your variety of ammunition. 4" barrel for launching toilet paper (be sure to use wadding), 3/4" for launching paintballs, etc.
Bevel the outside edge of your barrel to make the loading process easier. The tip is beveled with a file. When loading the potato, lemon, ext. the barrel will cut the ammo to the appropriate size.
Try constructing a water balloon launcher!
F.A.Q.- "Frequently Asked Questions"Question: What should I do if my batteries die while the cannon is charged with air?
Answer: You can drain your cannon using the bleed screw. It is mounted on the solenoid valve. NOTE: If you oven the screw to fast it will open the valve so be sure to just crack the screw until air slowly leaks out.
Question: What else can I shoot out of this gun?
Answer: Try water! Just fill the barrel up with water and shoot it at someone. They make great water guns. Try bouncy balls!
The construction is fairly straight forward as pictured above.
This is enough information for most handymen to build the P.A.C. 2 air cannon on your own and this is all the information that is available on it since the original website is now shut down.
The P.A.C. 2 Bazooka Air Cannon Plans
The P.A.C. 2 Detailed Plans are from a website that shut down so we offer this literature for others to use to build this P.A.C. 2 air cannon. From support at xinventions .com