
P.A.C. 3 Pneumatic Air Cannon Plans
WARNING: No Liability Is Assumed By The Developers Of This Website and All Literature Is Provided Second Hand, Use It At Your Own Risk!
For Accurate firing of Projectiles
P.A.C 3 Pneumatic Rifle Air Cannon Plans
Pneumatic Air Cannon Launcher - P.A.C. 3
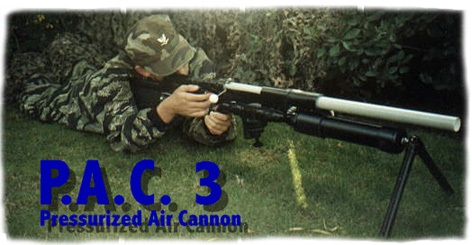
Picture: the PAC 3 launching paint grenades for a Paintball game
This is an archive file from a website that closed down of the third P.A.C. pressurized air cannon made (the P.A.C. 3).
P.A.C. 3 - Pressurized Air Cannon Rifle
The P.A.C. 3 Pneumatic Rifle is a unique air cannon for many reasons. The cannon combines a rifle stock set-up, breech loader, bipod and much more!
This cannon can shoot all sorts of projectiles. With a 1.5" barrel it can shoot a spud over 200 yards. That's not bad for its compact size.
P.A.C. 3 w/ breech loader
Perhaps one of the greatest features with this cannon, is the breech loader (not included in P.A.C. 3 plans).
You can totally eliminate muzzle loading with this device. Loading speed is safer and most of all, faster! With a simple, "Click, Click" you'll be ready to fire.
The flare projectile is recommended for this loader, however apples and potatoes can be used as well.
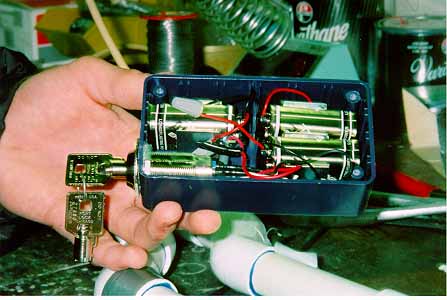
P.A.C. 3 electronics
 The
electronic system used to fire this cannon is very safe and reliable.
The
electronic system used to fire this cannon is very safe and reliable.
There is a key-switch for ultimate prevention from someone else using the cannon without permission.
There is also a safety toggle-switch and a momentary-switch used to fire the cannon.
The trigger mechanism is safely guarded by the PVC frame (stock) and prevents an accidental firing. The electronics box is held securely in place by the stock set-up.
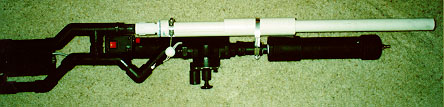
P.A.C. 3 stock set-up
The most convenient thing about this cannon is the stock configuration.

The set-up allows you to look straight down the barrel when firing.
There is no chamber blocking your view, like on standard potato cannons. With this ability the accuracy is drastically improved.
The stock of the cannon, rests right in your shoulder like a normal rifle would, making it much more comfortable to fire. It's amazing how you can hit small targets repeatedly, with ease.
The P.A.C. 3 does not just have one chamber, as most people speculate. It has two; one under the barrel, and one on the side of the cannon. Here is a sample diagram from the plans:

The construction is fairly straight forward with the information provided.
This is enough information for most handymen to build the P.A.C. 3 cannon on your own and this is all the information that is available on it since the original website is now shut down.
The P.A.C. 3 Pneumatic Rifle Air Cannon Plans
These P.A.C. 3 Detailed Plans are a rough draft of the original since those are unavailable now that their website shut down, but the directions below should work fine for you if you are a handyman.
How To Build this P.A.C. 3 air cannon.
P.A.C. 3 - Bipod
It is always best to follow the instructions. ALWAYS USE SCHEDULE 40 PRESSURE PIPE OR STRONGER.
You will need to select what style you want. (over and under/ where the barrel is situated over the air chamber, double valved/ where there are 2 valves to release the air quicker. Must be two solenoid valves) Then if you want an electric or manual valve.
OVER AND UNDER P.A.C. 3 AIR CANNON MATERIALS:
- 2 meters of 50mm (2 inch) pressure pipe
- 1 Meter of 25mm (1 inch) pressure pipe (depends on how big the valve is, but 25 is a good size
- 2 90 degree 25mm elbows
- A valve
- a 50mm tee
- 2 50mm couplers
- male or female adapters (depends on your valve)
- 2 50mm to 25mm reducer
- 50mm end cap
- a tire valve (like on bikes)
- 3 hose clamps about 100-150mm
- PVC cement
- hobby glue (rubber to plastic)
- 2 25mm couplers
- wire brush drill attachment
- Hand pump or a compressor
Fabrication
Instructions
Air Chamber Fabrication:
- cut off a 56cm long bit of 50mm pipe
- drill a hole in your end cap so that it can fit your tire valve in but not so it goes all the way through
- glue your tire valve into this and make sure it is completely dry and hard before you get on with the next step
- Glue the end cap on one end of your bit of pipe that you just cut
- glue one of the reducers onto the other end
- cut off a 21cm long bit of 25mm pipe and glue it in the 25mm bit of reducer
- on the other end of this bit glue a 90 degree elbow
- In the other end of this elbow glue a 7 cm long bit of 25mm pipe
- Now glue the other elbow on to this bit of pipe making sure it is in line with the other elbow
- now glue a 4.5cm bit of 25mm pipe into the other other end of the elbow
- onto the end of this pipe glue a 25mm coupler, then straight into that glue an adapter (make sure you have the adapter for the right end of valve)
- After the adapter put Teflon tape around the screw threads and screw on the valve.
Barrel Fabrication:
- Cut a 72cm long bit of 50mm pressure pipe. This will be the sliding bit of the breeched barrel
- Take one of your 50mm couplers and using the wire brush drill drown to about halfway and take off bit by bit until the barrel is a far way in but cannot come out easily. Glue the un-drilled end on to the barrel (72 cm bit)
- Take the other adapter and glue the remaining 25mm coupler on to it. Then on to the coupler glue the remaining reducer
- On to the reducer glue a 3cm long bit of 50mm pipe so that 1.5cm is sticking out. on this glue the other 50mm coupler. The coupler and reducer should be touching
- Screw this bit on to the valve
- Take your tee and using the wire brush drill take about a millimeter of the inside so the barrel slides with ease through it
- onto the base of the tee glue a 65mm bit of 50mm pipe. you will need to curve the front and the back edges of this bit of pipe so it sits flat on the air chamber
- Then make a slot for a hose clamp in the sides of this bit of pipe. You can easily do this with a hack saw and a file
- Thread the hose clamp through the slot and around the air chamber, with the barrel in the tee. Position so that the hose clamp is about 10cm from the end cap
- You will need to place another handle like this one to support the barrel when the breech is open. It should be about 8 cm long With the curves on both ends and the slots for the hose clamps. It should be positioned on the reducer and on the pipe of the air chamber
- For the magazine you will need to cut up some off cuts of 50mm pipe to a length of 13cm
Firing The P.A.C. 3 Air Cannon:
- If you are firing water bombs or golf balls or something else like that you will probably need some buffering. You can make this from 2 polystyrene cups that have been trimmed down to match the ID (inside diameter) of the clip. Have one facing out and one facing towards the valve
- You will also need to lubricate the barrel with water. The best way to do this is to get an ironing sprayer and put a few squirts down the barrel when it is loaded
- when you are priming it up, start at a low PSI and work your way up the pressure until you get a good shot each time or it becomes to hard
- If you are using an air compressor make sure you wear safety goggles.