

PVC Trip Mine "Build-it-Yourself"
WARNING: No Liability Is Assumed By The Developers Of This Website and All Literature Is Provided Second Hand, Use It At Your Own Risk!
- Build PVC Trip Mines, FREE PLANS
Feeling the pressure?
PVC Proximity Trip Mine Plans, Method 4
With Remote Control
Materials Needed: (All of these materials can be bought at Eagle Home and Garden and/or Ace Hardware or any other plumbing store)
- 1 PVC Cap 2"
- 1 PVC Reducing Bush 2"x ¾"
- 1 PVC Coupling 2"
- 1 PVC Street Ell ¾"
- 1 ¾" Automatic Sprinkler Valve with both male connectors
- 1 PVC Reducing Bush 1"x ¾"
- 1 PVC Coupling 1"
- 1 PVC 90 NK Ell Reducing 1"x ½"
- 1 PVC Male adapter ½"
- 1 2"x8" Class 200 PVC Pipe
- 1 1"x8" Class 200 PVC Pipe
- 1 ½"x4" Class 200 PVC Pipe
- 1 Shrub Head Sprinkler (Rain Bird)
- 1 Tire Stem Valve
- 1 Clear PVC Cement
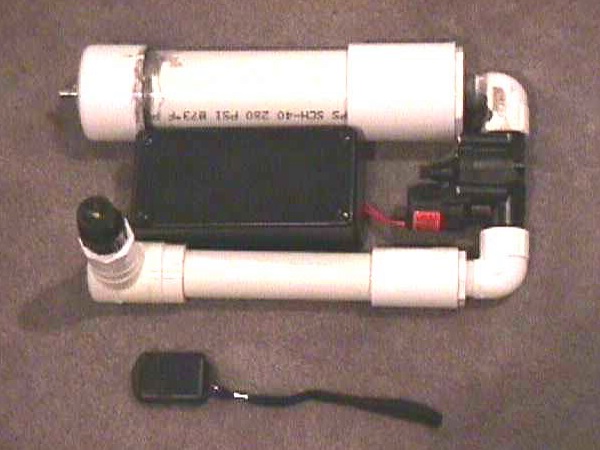
Remote Control Proximity Trip Mine Fabrication and Assembly Instructions
Click to enlarge picture
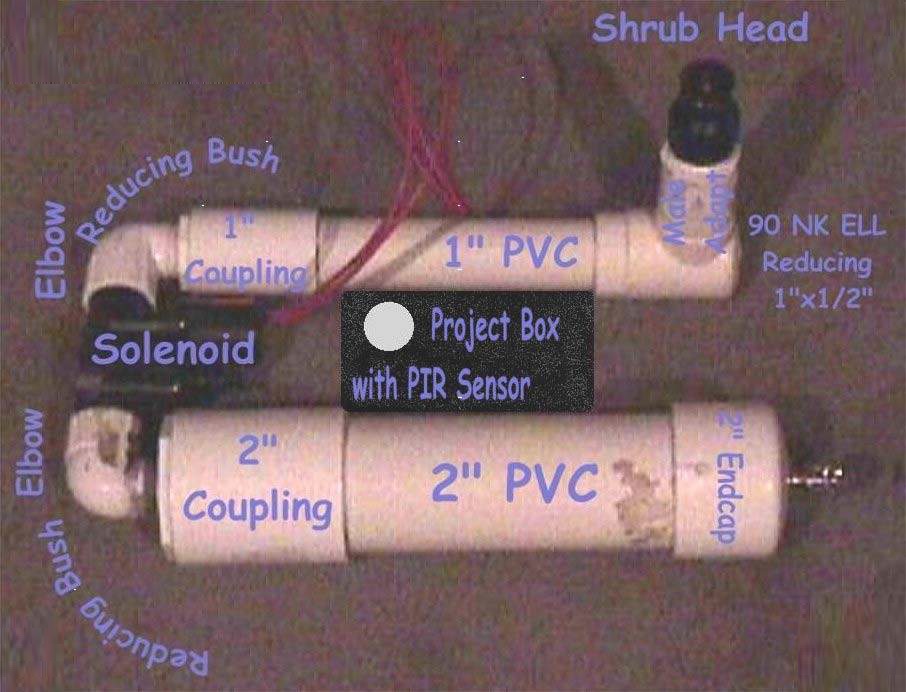
- Assemble all the parts together just like in picture below.
- Note: The ½" pipe holds the male adapter and the reducer together.
- Also, make sure you get the direction of the solenoid right! The arrow on the solenoid should be pointed towards the sprinkler part of the mine.
- If you don’t like the pattern or spray of the sprinkler head, try some different ones, you don’t even have to use a sprinkler head if you don’t want to.
- The tire stem valve is mounted on the 2” end cap, which allows air to be pumped into the air tank.
Building the Remote Control Trip Mine Activator:
Materials:
- 2 Channel Remote Control Relay Kit Part#6082-KT(Can also order extra remotes: Part#8974-MI)
- PIR Motion Detector Module Part.#7860-KT
- 1 Project Box (Available at Radio Shack)
- Go to www.mpja.com to order relay and motion detector
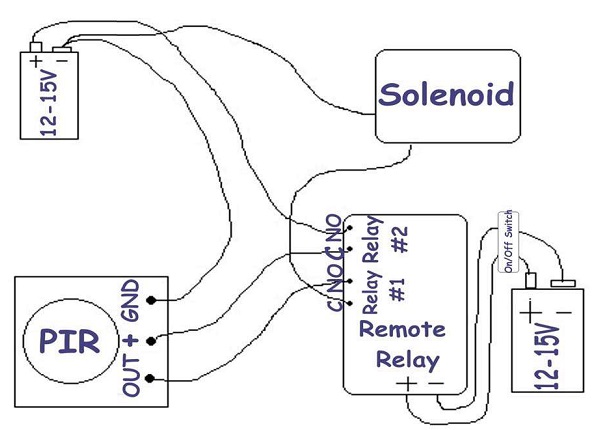
- Note: The remote control relay is only a kit, you need to fully assemble it before you can make the mine work!
- To put together the electronics just follow the diagram below. If you want to control the sensitivity, you can put a potentiometer between the positive side of the sensor and the battery.
- You can also add a super bright LED to relay#1 so you know when the mine is not activated.
- Once everything is put together, you can go ahead and place it into the project
box with the switch, PIR sensor, and antenna glued on the
outside. Make sure it’s water-resistant by just sealing it with super glue because it will get wet! - The box is what’s holding the mine together so make sure it’s very
stable and secure to both sides.
Filling the mine:
To fill up the tank you can either use a bike pump, scuba tank, or my favorite; it’s a little handheld filler that allows you to insert a Co2 cartridge and fill up your tank. It is made especially for bike tires, so you can find them at any local bike shop.
Also, be sure you only fill it up to 100psi. And nothing over! It can be very dangerous to fill it up with too much pressure. Once you are done filling it, you can unscrew the sprinkler head on the other side.
You can make your own paint just by mixing some vegetable oil with some non-staining coloring. You don’t have to fill it up all the way.
Once done, just screw the sprinkler head back on, and place the mine wherever you want it.
Using the mine:
To activate the mine, you must leave the second relay on for at least a minute. Not doing this will make the mine go crazy and spray paint all over the place just when you don’t want it to!
To activate the second relay, just press button #1 on your
remote. When you want the mine to really activate, press down button #2 on your remote,
making sure you’re at least 10ft. away for safety.