
Antenna Launcher Air Cannon Plans
WARNING: No Liability Is Assumed By The Developers Of This Website and All Literature Is Provided Second Hand, Use It At Your Own Risk!
For Installing Antenna Stability Guide Wire Cables
Pneumatic Antenna Line Launcher Air Cannon Plans
How to build this Antenna Launcher Air Cannon
 The
PAL Pneumatic Antenna Launcher Air Cannon is perfect for antenna guide wire installation
needs.
The
PAL Pneumatic Antenna Launcher Air Cannon is perfect for antenna guide wire installation
needs.
Propelling a projectile attached to a fishing line allows you to thread more durable lines, rope, or cable in order to install a stability guide wire to secure an antenna.
Its all easy with the Antenna Launcher Air Cannon!
 These
build it yourself antenna launcher air cannon plans are FREE but you can always support
our cause for compiling this air cannon resource to insure we can afford to keep it up on
the internet for you!
These
build it yourself antenna launcher air cannon plans are FREE but you can always support
our cause for compiling this air cannon resource to insure we can afford to keep it up on
the internet for you!
Antenna Guide Wire Installation System
These Plans Are Free But Please Consider Supporting Our Website
Fabrication Materials & Assembly Instructions
There have been a number of variations on the theme for antenna line launchers that are used to fire a projectile with a line attached so that antenna stability cables can be installed. This is just one concept of how to build an antenna line launcher. There’s nothing really special about it other than it looks, handles and shoots like a rifle.
Sighting down the barrel gives amazingly accurate results. Features include a built in
pressure gauge, battery operated release valve,
momentary action trigger switch and safety switch.
The fishing reel is mounted to a removable coupling that attaches to
the front of the barrel.
The projectiles are made from a short length of PVC tubing and two pvc caps.
A number of these launchers were built and tested with range/height results shown below. The numbers should be taken only as a rough estimate as variations in build precision and component tolerances will have an effect on the accuracy and range.
Approximate Range/Height vs. Elevation Angle Chart
| 45° | 50° | 60° | 70° | 80° | |
| 25 psi | 172/43 | 168/51 | 150/65 | 110/76 | 58/83 |
| 30 psi | 207/52 | 202/61 | 180/78 | 132/91 | 70/100 |
| 35 psi | 221/55 | 217/65 | 192/83 | 141/97 | 75/107 |
| 40 psi | 241/60 | 236/71 | 210/90 | 154/106 | 82/117 |
| 45 psi | 247/62 | 242/73 | 215/93 | 158/109 | 84/120 |
| 50 psi | 259/65 | 254/76 | 225/97 | 166/114 | 88/126 |
Antenna Guide Wire Launcher Air Cannon Plans
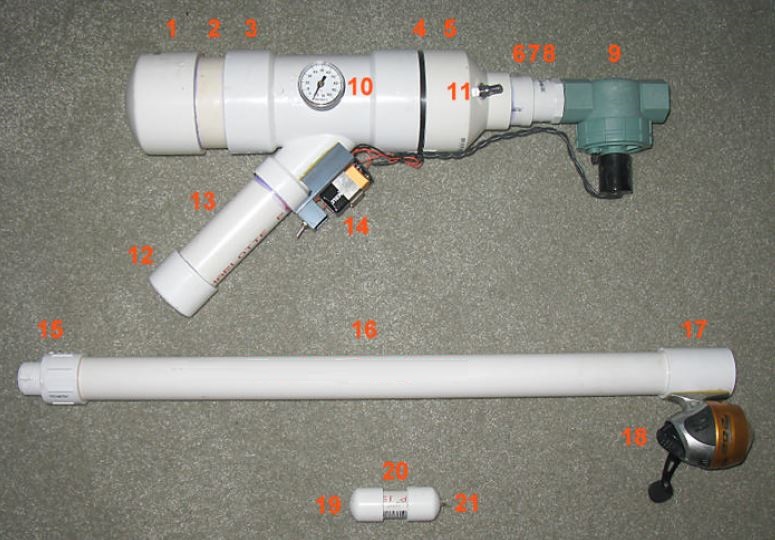
Antenna Launcher Fabrication Parts List
# Description
- 3” pvc cap
- 4” length of 3” schedule 40 pvc pipe
- 1.5” x 3” pvc reducing wye
- 3” length of 3” schedule 40 pvc pipe (to connect wye 3 and reducer 5)
- 3” x 1-1/2” pvc reducer
- 1-1/2” x 1” pvc bushing
- 1-1/2” length of 1” schedule 40 pvc pipe (not visible in photo)
- 1” pvc male adapter (slip x mpt)
- Sprinkler valve – Orbit 57461 1” female NPT both ends (Home Depot)
- Gauge 0-100 psi – 3847K72 (McMaster) or equiv.
- Schrader valve – Victor 04100-8 or equiv. (Advance Auto Parts)
- 1-1/2” pvc cap
- 6” length 1-1/2” schedule 40 pvc pipe
- Trigger/safety/battery assembly
- 1” x 1-1/4” pvc reducing male adapter (mpt x slip)
- 2’ length 1-1/4” schedule 40 pvc pipe
- 1-1/4” pvc coupling
- Fishing reel – Zebco 202 or equiv. (Walmart)
- 3/4” pvc cap
- 2-1/2” length of 3/4” schedule 40 pvc pipe
- 3/4” pvc cap
Sourcing Parts For Your Antenna Launcher
PVC pipe and fittings and sprinkler valve can be obtained from Home Depot, Lowes, or plumbing supply houses. The fishing reel can be obtained from chain stored like Walmart, Kmart and the like. The pressure gauge and Schrader valve are available from auto parts stores.
Antenna launcher Fabrication and Assembly
The WYE fitting should be drilled and tapped for the air pressure gauge and the 3” x 1-1/2” reducer drilled to accept the metal Schrader valve before assembly. The order of pvc assembly is not particularly critical. I start at the back end of a unit and worked forward.
The trigger/safety/battery assembly is the most difficult part of construction. I machined mine out of pvc channel and used epoxy to attach it to the handle. Other construction techniques could work equally well. The trigger is a momentary action toggle switch (Mountain 10TC262 from Mouser). Two 9-volt ‘square’ batteries operate the valve. In series with the toggle switch is a miniature rocker switch, which is used as a safety.
The fishing reel is attached with epoxy to the 1-1/4” coupling. The bottom of the fishing
reel mount is contoured to approximately the
same radius as the coupling. This can be done with a drum sander or alternatively, a piece
of sandpaper wrapped around the coupling.
The pvc projectile has only one end cap cemented to the pipe to allow additional weight to be added inside the projectile (if needed). Two small holes are drilled in the end of the cemented on cap and a cut off paper clip is pushed through the holes and the wires simply bent over inside (it’s best to do this before cementing the cap). This forms a ‘low profile’ loop on the outside of the projectile. The end of the fishing line is fitted with a standard fishing barrel swivel, which attaches to the loop on the projectile.
How To Use The Antenna Launcher Air Cannon
Estimate the total distance (range) from the launch point to where you would like the projectile to land. Estimate the height (height) of your target. Use the table provided above to determine the appropriate pressure for the desired height and range. Pressurize the air chamber using an air pump. A test shot may be made with or without the fishing line. The difference in range/height with and without the fishing line in tow is negligible.
Make sure the down range is clear. When ready to make the actual shot, press the spinning reel line release button and attach the projectile to the fishing line. Insert the projectile into the barrel with the fishing line connection toward the open end of the barrel. Make sure the down range is clear. Aim the launcher by sighting down the barrel and operate the trigger.
Since the launcher uses 10 lb fishing line it will likely be necessary to pull an intermediate weight line before the final antenna support line. Small diameter nylon ‘mason line’ or similar material works well.
Safely Operating Your Air Cannon
The material used in building the antenna launcher is Schedule 40 pressure rated PVC. This material is designed for working pressures well in excess of what we’re using here. Some PVC pipe manufacturers recommend against its use with compressed air. If fractured PVC shrapnel may be expelled.
Use common sense, routinely inspect the launcher for signs of cracks or other damage. Don’t use pressures greater than necessary to get the job done. Do not use in very low or very high ambient temperatures. Low temperatures make the PVC brittle and high temperatures make it soft. Wear safety glasses when using the launcher. Further information on PVC pipe and fittings.
Treat the launcher as you would a firearm and exercise caution. Always point the muzzle in a safe direction. Use the Approximate Range/Height vs. Elevation Angle chart above to estimate range and height for each launch. Make sure it is clear down range before launching.
Don’t store the launcher loaded and/or pressurized. Detach the barrel and store in a different location when not in use for an extra measure of safety. Basic gun safety rules can be found at NRA gun safety rules.
Legality of Air Cannon Launchers
The Bureau of Alcohol, Tobacco and Firearms has determined that pneumatic launchers are not firearms. Some municipalities may have regulations that affect the ownership or use of such devices. While these rules are not common, the ones that do exist usually apply to combustion type launchers and not pneumatics. Check with your local authorities to be sure. A letter from the BATF on this subject can be found on our air cannon legality page.