TB Triple Barrel Air Cannon Plans
WARNING: No Liability Is Assumed By The Developers Of This Website and All Literature Is Provided Second Hand, Use It At Your Own Risk!
For Firing Multiple Projectiles In One Shot
TB Three Barrel Launcher Air Cannon Plans
How to Build a TB Triple Barrel Air Cannon
 The
TB Triple Barrel Air Cannon is perfect for adding additional projectiles to launch at the
same time.
Propelling multiple projectiles with the three barrel launcher insures total saturation! and fun!
Dominate with the TB Launcher Air Cannon!
 These
build it yourself tb triple barrel air cannon plans are FREE but you can always support
our cause for compiling this air cannon resource to insure we can afford to keep it up on
the internet for you!
TB Triple Projectile Air Cannon Plans
Fabrication Materials & Assembly Instructions
Component Parts (all parts are scheduling 40 PVC
- A: 1 = (3’’ PVC Double Wye), 3" by 3’’ by 3’’ are the front and rear openings. This is the main chamber.
- B: 3 = 3’’ to 1.5’’ reducers (these are flat reducers)
- C: 2 = 1.5’’ diameter by 19.5’’ long (the two outer barrels)
- D: 1 = 1.5’’ diameter by 21.5’’ long (the center barrel)
- E: 2 = 3" 45 degree street elbows (this is so you can get all three barrels going in the same direction)
- F: 1 = 3’’ Cleanout screw cap with slip fitting (see picture below)
- G: Pneumatic Add-On
How to Build a Three Barrel Air Cannon
 When
building this cannon, change the ignition system into a pneumatic one. Just use my
Pneumatic Add-On attached to (F
= 3" Cleanout) to convert this to a more powerful cannon.
Triple Barrel Assembly
Just like any other cannon you assemble this one is assembled in the same way with PVC cement.
For the power punch, you can use my Pneumatic Add-On.
 Then
use the Filling the Air Chamber Section to fill it and use the Valve System Section to learn
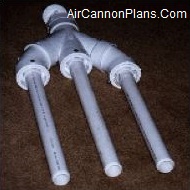
to hook that up. Here are some pictures of the Cannon.
I put bolts through the barrels to hold them extra tight and also so the potatoes don’t fall back into the chamber area.
Be sure to use the proper primer and PVC cement on all joints and push them together tightly.
Hold them in place for a minute or two to ensure they do not come loose before bonding.
Assembly Instructions
- Start by inserting the two street 45 degree elbows by lining them up to point straight forward. Laying the PVC double Wye and elbows on a flat surface will help line them up correctly.
- Then cement the 3" x 1.5" reducers into the barrel sleeves.
- Now cement the barrels into the sleeves, short barrel in the middle.
- Then cement the slip fitting with screw cap cleanout into the other end of the chamber.
 Now
that you have the main PVC body assembled and have let the PVC cement dry thoroughly the
main assembly procedure is behind you.
The PVC threaded end cap is where you will attach the firing mechanism, depending on which option you choose to use, fuel based or straight air pressure with the pneumatic add on.
With fuel based you will need an ignition system as shown in our tp air cannon plans, or as you can see in the picture below, you can add a bigger air chamber triggered by a pneumatic sprinkler valve air pressure release system as shown in our pneumatic add on.
